USB File Transfer (Update Mode)
Update Mode exposes the scooter as a USB drive on your computer. Copy files into the appropriate folder, safely eject the drive, and the scooter processes them automatically.
Entering Update Mode
You can enter Update Mode from the dashboard or the command line.
From the dashboard
- Double-tap the left brake to open the menu
- Go to Settings → System → Update Mode…
From the CLI
lsc usb ums
To switch back to normal (network) mode:
lsc usb normal
Leaving Update Mode
Hold the left brake for 3 seconds. The dashboard shows the hold as Cancel while Update Mode is still preparing, and as Exit once the drive is live.
- While preparing: the entry is abandoned before the USB gadget switches over, so the network connection is never dropped.
- Once active: the scooter switches the USB port back to network mode and processes whatever is on the drive, exactly as it does after an eject. Eject on your computer first so the files are fully written.
No other gesture leaves Update Mode. A right brake press or a seatbox tap is ignored on purpose, so a stray input can't interrupt a transfer. lsc usb normal works too.
Transferring files
- Open the footwell with a PH2 Phillips or H4 hex driver to reach the MDB. Its Mini-B port is normally occupied by the internal DBC USB cable.
- Undo the cable's retaining screw with a flat-head or PH1 screwdriver, then disconnect the internal DBC USB cable from the MDB.
- Connect your computer to that Mini-B port.
- A drive appears on your computer.
- Copy files into the appropriate folder (see below).
- Safely eject the drive. The scooter processes the files; a firmware update then triggers a reboot.
- Leave Update Mode, disconnect your computer, then reconnect and secure the internal DBC USB cable.
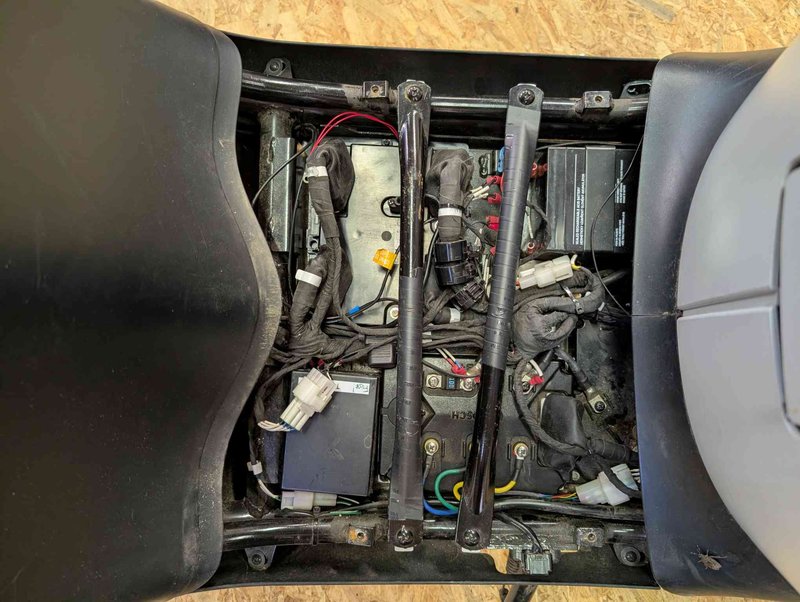
The MDB sits in the open footwell.

Disconnect the internal DBC USB cable to free the Mini-B port.
After processing, the drive is wiped apart from ums_log.txt, so the next session starts clean.
What's on the drive
The scooter creates these folders when Update Mode starts. An empty folder is normal and does not indicate a problem.
| Path | What it's for |
|---|---|
system-update/ | Firmware artifacts, .mender or .delta |
maps/ | Map display tiles and Valhalla routing tiles |
Map display tiles
Copy any .mbtiles file into the maps/ folder on the drive. The scooter installs it as the offline map source.
Download pre-built tiles from Librescoot OSM Tiles releases.
Valhalla routing tiles
Prefer a
.tar.zst release: it reduces the download and USB transfer size, and the scooter unpacks it automatically.
Copy the downloaded archive into the maps/ folder as-is. The scooter accepts any file name ending in tiles.tar or tiles.tar.zst, including release files such as valhalla_tiles_<region>.tar.zst.
Download pre-built routing tiles from Librescoot Valhalla Tiles releases.
Firmware updates
Copy .mender or .delta artifacts into the system-update/ folder to install a firmware update without a SIM card. This is the only thing that triggers a reboot; everything else is applied by restarting the affected service.
Troubleshooting
- Drive doesn't appear: make sure the scooter is in Update Mode (check dashboard or run
lsc usb status). Try a different USB cable. - Files not applied after eject: check that you safely ejected (not just unplugged). The scooter needs the eject event to trigger processing.
- Scooter doesn't reboot: reconnect USB and eject again, or reboot manually with
lsc power reboot. A USB update can simply be retried from the start. - Wrong channel or map region installed: the scooter installs exactly the files you copied, and a firmware artifact from another release channel switches you to that channel. Download the artifact or tiles for the channel and region you want now and run another Update Mode session.
Under the hood (for maintainers)
This section is for maintainers and administrators. It is not needed for normal riding.
Update Mode is managed by ums-service on the MDB. It switches the USB port from network mode (USB Ethernet) to USB Mass Storage mode, exposing a partition on the scooter's eMMC as a removable drive. When the drive is ejected, ums-service detects the eject event and works through the drive in a fixed order: settings, WireGuard, radio-gaga, uplink-service, onboot.sh, firmware updates, maps, scripts. Each step is independent, so one failing doesn't stop the rest, and ums_log.txt records what each one did.
In addition to the two rider-facing folders above, the drive contains:
| Path | Direction | What it's for |
|---|---|---|
scripts/mdb.sh, scripts/dbc.sh | to scooter | Shell scripts run once on the named board |
settings.toml | round-trip | Current settings, exported for you to edit and read back |
wireguard/ | round-trip | WireGuard configs, exported and read back |
radio-gaga/config.yaml | round-trip | radio-gaga telemetry config |
uplink-service/config.yaml | round-trip | uplink-service config |
onboot.sh | round-trip | Script the scooter runs on every boot |
diagnostics/mdb/, diagnostics/dbc/ | scooter writes it | journal.log and dmesg.log from each board, collected on entry |
log-bundles/ | scooter writes it | Bundles previously captured with lsc, copied out for you |
ums_log.txt | scooter writes it | What happened during processing. Written on the way out and kept when the drive is wiped |
Round-trip means the scooter writes its current file to the drive when Update Mode starts and reads it back when you leave. Edit that file in place rather than creating a new one; if it is unchanged, the configuration stays unchanged.
Configuration
Changing settings.toml or anything under wireguard/ restarts librescoot-settings. Changing radio-gaga/config.yaml restarts radio-gaga, and uplink-service/config.yaml restarts librescoot-uplink. Nothing is restarted if the file came back unchanged.
Scripts
Scripts named mdb.sh and dbc.sh under scripts/ are run once each, on the board their name says. Anything targeting the DBC is skipped if the DBC can't be reached.
Scripts run as root
There is no sandbox or signature check. Only copy scripts that you wrote yourself or whose source you trust.